Retopology : Is the act of recreating an existing surface with more optimal geometry.

Reference Link: https://giovanniluccablog.files.wordpress.com/2012/08/human-head-topology.jpg
A common use-case is creating a clean, quad-based mesh for animation, but it’s also used for most any final object that needs to be textured, animated, or otherwise manipulated in a way that sculpted meshes can’t be.


By: Héctor S. D’Ors Character 3D Artist at Mercury Steam Reference Link: https://www.artstation.com/artwork/GeLeQ
Topology lets you reduce the number of polygons in a mesh; overall polygon count, a target number of vertices, or a target number of triangles that you specify. When you use topology process you need to retain the original shape as part of the reduction process.
 Reference Link: MAKING OF – RETOPOLOGY IN TOPOGUN
Low Poly game character topology example:

With a better planned/correct topology we can achieve a much better result with less poly count:
Reference link and article: http://thundercloud-studio.com/tutorial/modeling-guide-realistic-human-head/

Example of how a bad topology cannot hold up when being deform during animation due to poor skinning and topology, the polygons at the mouth corner are being stretched as bad as they can:


Posted by on
 Reference images from “D’artiste: Character Modeling” – Ballistic Publishing 2005
——————————————————————————————————————————————
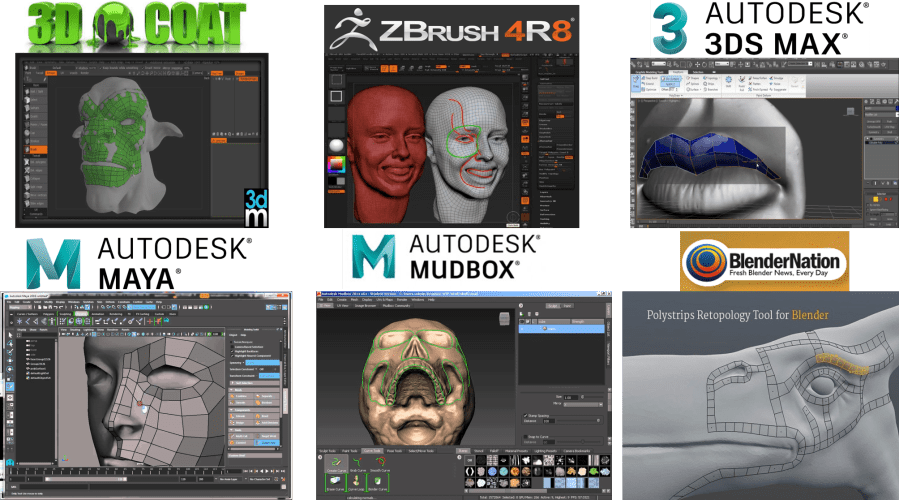
Most of well known 3d modeling applications include topology tools as part of the software package.
We will use Maya
Maya vs. Maya LT
Maya LT is basically a subset of Autodesk’s Maya package. Maya LT is designed mostly for game asset creation, and as such, it has less features than Maya. … But again, the core functionality of Maya, which is modeling, texturing, and rigging, are in Maya LT.
Maya vs. Maya LT
Products |
|
Pricing
|
|---|
|
Pay as you go for access to the latest version of Maya with lower up-front cost, 1-on-1 web support, and previous version use. Learn more. |
||
|---|---|---|
|
Monthly |
$185.00 |
$30.00 |
|
Annual |
$1,470.00 |
$180.00$240.00 |
|
Multi-year (2 years) |
$2,940.00 |
$360.00$480.00 |
|
Multi-year (3 years) |
$4,410.00 |
$540.00$720.00 |
If you use ZBrush or Mudbox or any other 3d modeling application, export your files first; best formats are OBJ or FBX or to Maya directly; I prefer obj format.
Short intro to Maya tools to complete re-topology process:
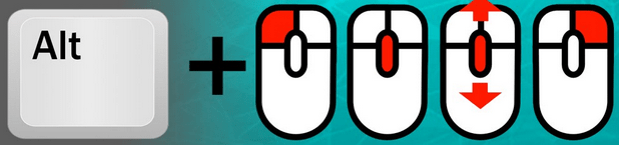
Maya Hotkeys:
| Tumble, Track, or Dolly | ||
|---|---|---|
|
Alt |
Left mouse button |
“tumble” or rotate the camera around a central pivot. |
|
Alt |
Middle mouse button |
Allows you to track the camera, shifting the viewport horizontally or vertically while maintaining a constant angle of view. |
|
Alt |
Right mouse button |
“Dolly” or move the camera in and out. This can also be accomplished with your mouse’s scroll wheel, however the dolly command is more precise |
Maximize and Minimize a Viewport
1.Hover the cursor over any viewport window and press the spacebar to maximize the viewport.
2.Press the spacebar again to return the viewport to a four-panel view. At the top menu, select Window and then View Arrangement to alter the window sets in Maya.

Retopologize a mesh with Quad Draw
To set a reference mesh:
- Select the object you want to use as your reference mesh.
- Do one of the following:
- Click the Make Live icon
 in the Status Line.
 - Right-click the object, and then select Make Live.
The mesh becomes live, and the Quad Draw tool can snap to its surface.
- Click the Make Live icon
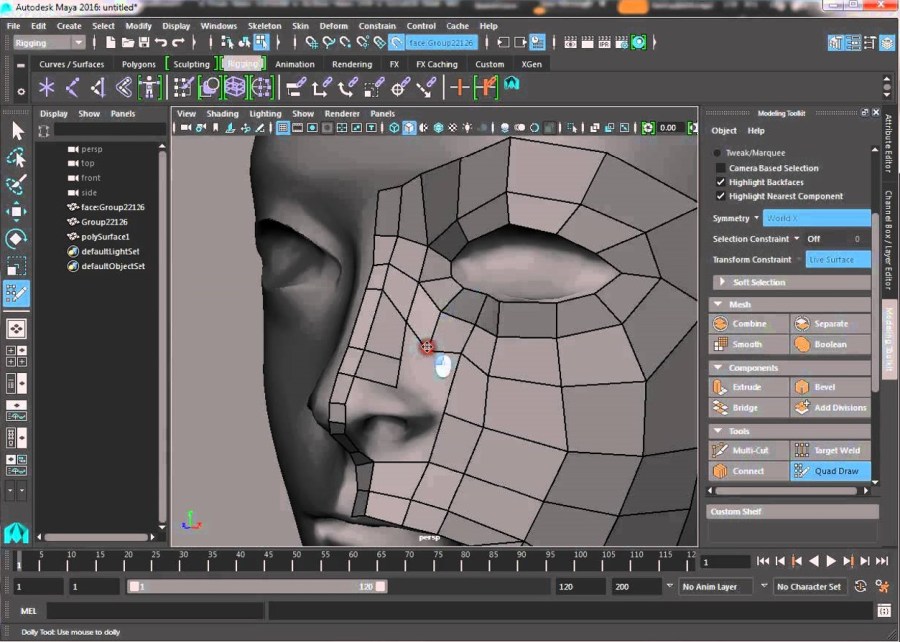
3. Open the Quad Draw Tool by doing one of the following:
- From the Tools section of the Modeling Toolkit window, click
 .
. - From the main menu bar, select .
- From the marking menu, select Quad Draw Tool. (To open the marking menu, Shift + right-click in the scene.)
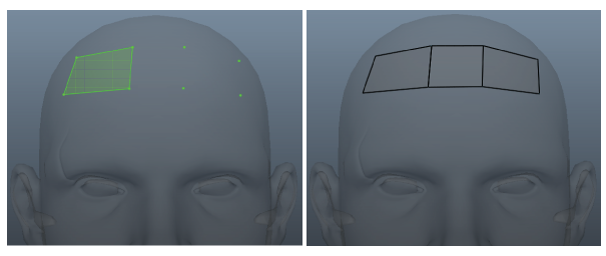
4. Set Symmetry appropriately in the Modeling Toolkit if you want to create symmetrical dots across an axis.
5. Drop dots: define vertices- Click anywhere on the reference mesh. A green dot appears and snaps to the surface of the reference mesh. You can drag a dot to a new location to reposition it or you can remove a single dot by holding down Ctrl + Shift-click on it .
6. Continue to drop dots until you are ready to create polygons.
Quad Draw Tool hotkeys
| Hotkey | Operation on quad mesh | Operation off quad mesh |
|---|---|---|
|
Click the reference surface or grid |
||
|
Drag or Middle-drag |
||
|
Shift-drag |
||
|
Shift + Middle-drag |
||
|
Ctrl-click |
||
|
Ctrl + Middle-click |
||
|
Ctrl + Shift-click |
||
|
Ctrl + Shift + Middle-drag |
||
|
Tab-drag |
||
|
Tab + Middle-drag |
||
|
y |
Reactivate the Quad Draw Tool |
Reactivate the Quad Draw Tool |
|
Ctrl + Shift + right-click |
Open Quad Draw Tool marking menu |
To create polygons with Quad Draw:
- In your scene, move the cursor over dots while holding Shift; Shift-click.
- A new surface called polySurface1 is created. Continue to add faces by dropping additional dots and extending existing edges.

- Fill triangular shaped holes in your new mesh. Move the cursor over a triangular shaped hole with three border vertices while holding Shift.
- Shift-click the purple face preview. A triangular face appears, filling the hole.

Refine polygons with Quad Draw:
- Ctrl + move your mouse over the mesh.
A green dotted edge loop preview line appears on the mesh, indicating where the new edge loop will be inserted.
- Click to insert an edge loop.
To insert an edge loop that snaps to the center of a face
- Ctrl + middle-drag your mouse over the mesh.
- Click to insert an edge loop.
Delete components with Quad Draw:
To delete components with Quad Draw
- Ensure that Quad Draw is turned on.
- Do either of the following:
- To delete a face, Ctrl + Shift-click a face.
- To delete an edge loop, Ctrl + Shift-click an edge loop.
Note: If you delete a border edge loop, the corresponding border faces are also deleted.
_____________________________________________________________________________________________
download Tutorial files.zip
______________________________________________________________________________________________
Reference links:
Topology collection (topology loop samples:
Topology Collection: Head Overview
Topology Collection: Male and Female Torso
Topology Collection: Shoulder overview
Topology Collection: Hand Overview
Topology Collection: Foot overview
Optimal Edge Loop Reduction Flows
http://topologyguides.com/ :
An essential skill of modeling is knowing how to properly reduce the number of edge loops from a high mesh density to a low density. This involves some tricky topology. So let’s have a look at how to best reduce the various flow types.
2-1 and 4-1
The 2-1 and 4-1 flows are the trickiest to handle. Most methods involve substantial distortion of topology and/or the addition of more loops to the left or right of the intersection.
So, after experimenting with different forms, the results above seem to offer the least mesh distortion despite containing Tris and N-gons.
I apologize to any quad purists out there for the lack of quads. 😉
3-1, 4-2, and 5-3
The three of these flows are very standard flows that involve redirecting the edge loops back towards their origin. This trick is very effective. and maintains almost perfect topology in most situations.
As you can see, the 4-2 and 5-3 flows follow the form of the 3-1 flow. With the only differing factor being the number of center loops. This shows just how adaptable this method of reduction can be.


Maya 2017 Update 3: Quad Draw / Make Live Workflow
How to Retopologize a Head like a Boss – Part 1
How to Retopologize a Head like a Boss – Part 2
TIMELAPSE MAKING OF – RETOPOLOGY IN TOPOGUN
